 FEATURED
Application Development & Modernization
Uplift enterprise IT with cloud-native modernization services that transform critical applications and empower peak performance.
Simplify the AI conversation. Build, scale, and optimize the way your business does AI.
Cut through the complexity of cloud technology and unlock its full potential with multi and hybrid cloud solutions and services.
Unlock collaboration that uplifts your organizations with cloud-based tools from Microsoft and Cisco to bring teams together.
Conquer security compliance complexities with targeted advising and assessment tailored to your company’s unique circumstances.
Consolidate your data management with an actionable plan for your business data.
Leverage DevOps and cloud-native principles to achieve business goals, enhance software delivery, and future-proof infrastructure.
Tailored solutions in Digital Commerce, Digital Marketing and overall Digital Strategy, unlocking your organization’s true potential.
Empowering better business starts with a better, modern data center.
Design a reliable networking solution around the requirements of your organization.
Transition from manual processes to streamlined, automated workflows for managing modern networks
Implement secure, scalable, and repeatable security measures shaped to serve your specific business needs.
Stay ahead of network needs and the competition with tailored optical transport and network infrastructure solutions.
FEATURED FEATURED
 FEATURED
 FEATURED
 FEATURED
 FEATURED
 FEATURED
 FEATURED
 FEATURED
 FEATURED
 FEATURED
 FEATURED
PETER WELCHER | Solutions Architect
This blog is part of a series covering various SD-Access topics. Previous blogs in this series include:
There are instances in the prior blogs where I recommended lab experience.
This blog addresses the obvious question, “what might a lab look like?” Please bear in mind that there is no single right answer. My hope is that by showing what worked for proof of concept at one site, I’ll either provide you with a lab solution or give you some food for thought.
Note: In general, with ACI, SD-Access, and SD-WAN, having a lab helps you work out issues and unknowns before trying them on your production network. Avoid painful surprises! Lately, that extends to API automation as well.
Lab Diagram
On the theory that a diagram is worth a thousand words, we’ll start with the diagram and follow with the words.
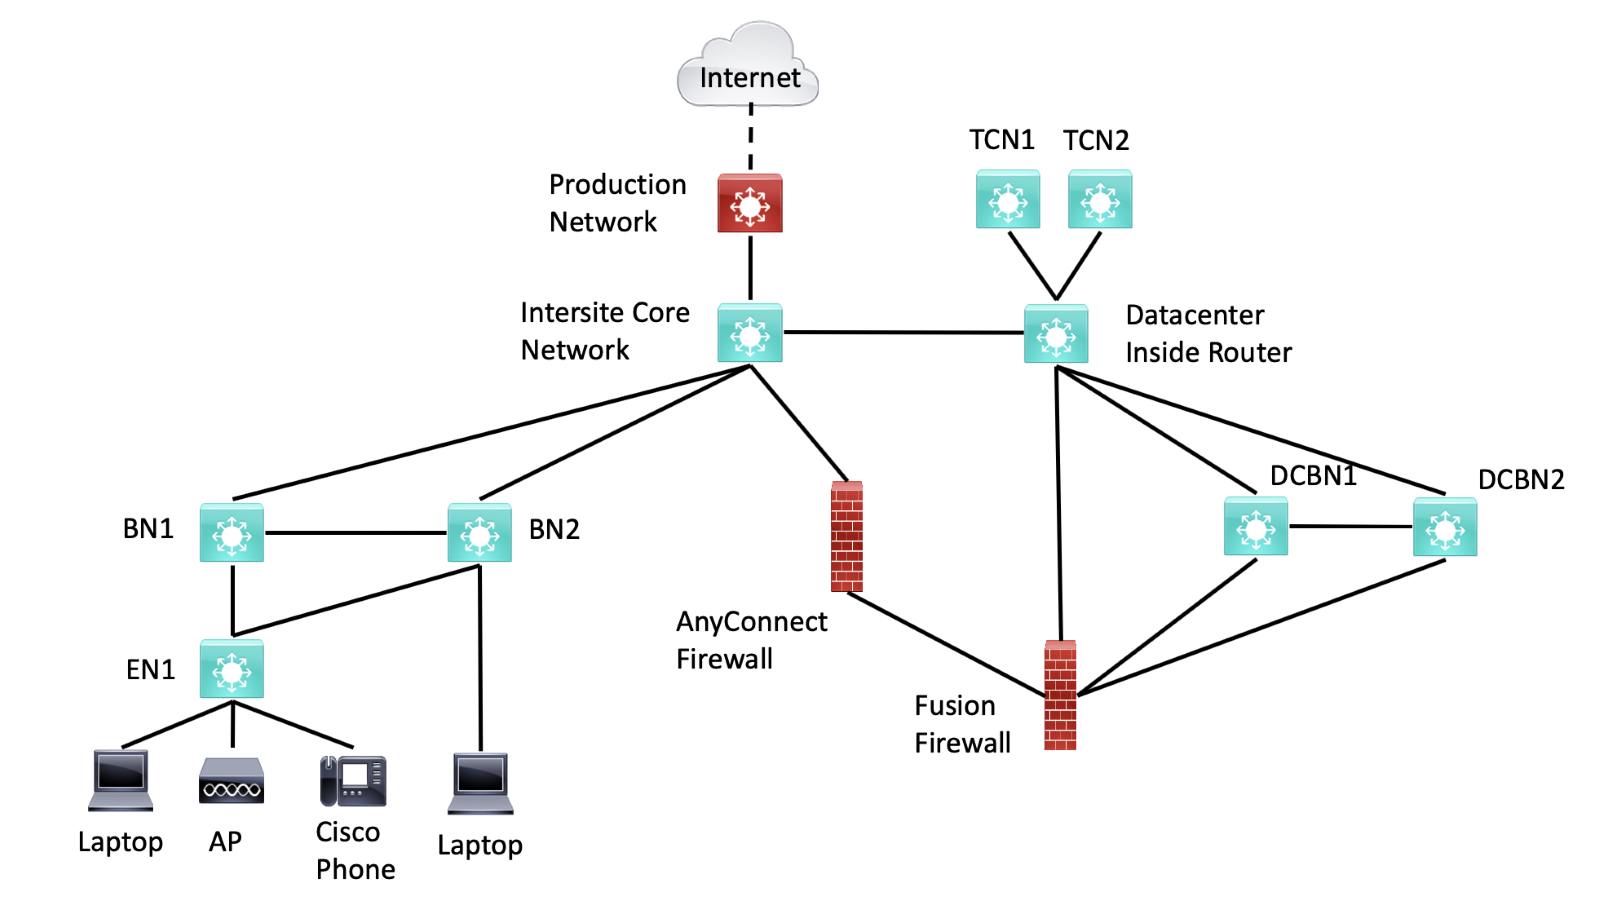
Figure 1: SD-Access Lab Diagram
Roles
The Core switch connects to the production network, but it also acts as the core MAN / WAN / whatever non-SDA routed network interconnecting the fabric sites and the datacenter.
The BN1, BN2, EN1 switches act as fabric sites. More details follow below.
The datacenter inside router is the router that connects the interior of the datacenter to the core MAN / WAN / whatever and the other sites. I used retired 3850’s for core and inside, since they’re not doing anything other than ordinary VLANs and routing, no SD-Access functionality needed.
The dotted line to the Internet indicates that there is network in between that is not shown. That’s just global routing. ISE and a CCC instance were also out on the Production Network. One dedicated server for each separate from Production services is nice if you can afford that.
Connecting to Production
Yes, the lab connects to production. Specifically, it is useful to connect lab to production somewhere. This lab was used during peak COVID, and it was very handy to be able to leverage corporate remote access to do lab work. That also offloads remote access to the lab and access security to the production network.
From the perspective of remote labwork, cabling extra connections and using VLANs in switches as “virtual patch panels” gives us flexibility. (Put two ports into the same VLAN and it acts like the attached devices are cabled to each other.)
We can always remotely shut down links that are not needed. (Carefully, so as not to cut yourself off!)
What can work reasonably simply yet provide some lab isolation is static routes. Let’s look at how that might work.
To set up the lab, you’ll have to assign the lab an IP block anyway. It might as well not conflict with the production network. For what it’s worth, I built the underlay infrastructure above using /27’s out of a /24, then used other /24’s for the SDA IP pools. So, a /21 block of addresses might be what you’ll want, assuming you’re willing to use subnets smaller than /24’s.
You can put the lab IP block in a static route on the connected production network router or L3 switch, with next hop the core switch. Redistribute that into the production IGP. On the core switch, you can point 0/0 at the production network, and redistribute that into the lab IGP.
I used OSPF for the lab and SDA underlay.
Staying Connected
If you’re working remotely, you really don’t want to lose connectivity. There are two more things you might want to do that aren’t shown.
First, if a spare console / terminal server is available, you might want to connect it to an Ethernet port on the Core switch and connect the serial connections to the various lab devices’ console ports. That gives you a “back door” if connectivity breaks, assuming you don’t screw up the Core to Production connection.
Second, if that is not available, or if you’re a belt and suspenders person, you might connect the management ports of the various devices back to the Core switch in a management VLAN. The theory is that minimizes the risk of getting disconnected by something you configure. That assumption held up pretty well for me, but then Murphy’s Law intervened.
Yes, for what it’s worth, I managed to cut myself off anyway doing AnyConnect labwork. I wasn’t aware of a key checkbox in ASDM. (We have people who are much more focused on firewalls and security, I’m more architecture and generalist.)
So, I managed to generate a 10/8 summary that was redistributed into the lab. (A behavior I think is a poor default choice.) That route propagated to the core switch and took priority over the 0/0 route there. This meant that my assigned remote access VPN’s IP in network 10 could no longer talk to the lab gear, even the core switch.
As an alternative, you might consider having the management ports on a switch that is directly connected to the production network and not doing any dynamic routing, no VLAN trunking, etc. Or just be mildly careful / have some spare “hands” available. In my case, the nearest production switch wasn’t anywhere near the lab space, it was a lot simpler to just have one connection to production.
Leveraging the Lab
Note that BN1, BN2 and EN1 let you emulate a smallish fabric site. The attached devices let you work with authentication, authorization and DHCP, and assignment of SG’s / SGT’s. I didn’t see much point in having a second edge node (EN). You can configure one of the BN’s to take on an EN role as well if you want to demonstrate EN to EN tunnels or something else requiring 2 EN’s in one site.
If you want to emulate two sites, shut down all but the core connections to BN2, and make it a FIAB site. You can then work with IP Transit between the two sites and the datacenter (on the right) if you want.
Having two BN’s in one fabric site lets you test failover, configurating IBGP between the BN’s on the crosslink, etc. That same reasoning is why there are two DCBN’s (datacenter BN’s) in the diagram. One will suffice for many purposes, but not failover.
There are two Transit Control Nodes, also for testing failover.
In the lab, the datacenter inside router is the first L3 switch off the MAN / WAN core. In production, it provides access to ACI, the Internet edge, etc. In the lab, those just happen to be out in the production network. For lab purposes, the inside router functions much as it would in production, but it may seem odd.
What’s different is that instead of going deeper into the datacenter to get to most of the datacenter, edge firewalls, and Internet, there is no real datacenter there. We route out to production and use the actual production datacenter, edge, etc.
See also the Services section, next.
The virtue of being tied to production and real Internet is that we can do other things, like upgrade code, hit real web IP’s, etc. I like to be able to ping 4.2.2.2 and 8.8.8.8, for example, as a test of end-to-end routing.
In the real world, I had the inside of the AnyConnect firewall connected to DCBN1, figuring that gave more flexibility. We ended up dedicating a VLAN on DCBN1 to simulate cabling the AnyConnect firewall directly to the Fusion Firewall (“FFW”). That is what you might do in production deployment as well.
Not shown: if you want to work with a physical WLC in the lab, you’ll need one. Attach it to the inside switch.
Shrinking This Lab
The core and inside routers / L3 switches could be combined if you’re short on gear.
If you are tight on gear, the FIAB BN2 switch might be repurposed to test failover with two datacenter BN’s.
Repurposing the FIAB BN2 switch for a second TCN for failover testing is always an option.
The following diagram uses red ellipses to indicate potential device savings.
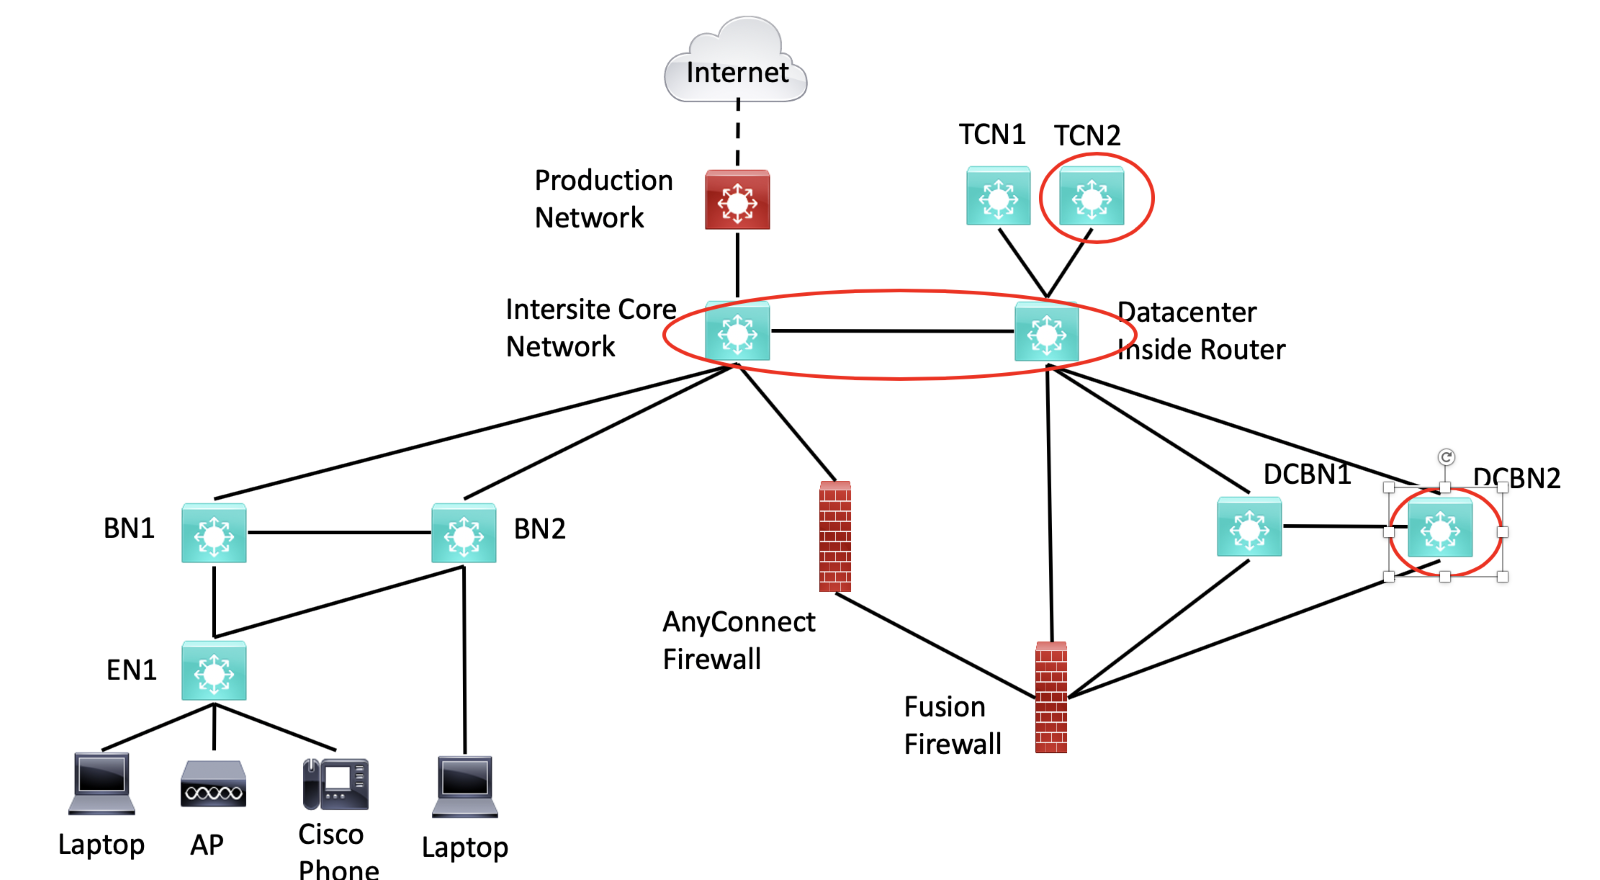
Figure 2: Less Critical Lab Equipment
I’ll note that having the extra gear is useful, so you can leave the SDA lab in place and use it to model changes or migration later on, complete with failover. If you’re tight on gear, then testing failover once and subsequently not testing it is entirely reasonable.
Summing up the repurposed gear discussion above:
That gets the minimum lab down to BN1, BN2, EN1, core/inside combined router, DCBN1, FFW, and AnyConnect FW (if you’re testing ISE to AnyConnect integration – otherwise it too can be omitted). Plus, standalone small versions of CCC and ISE located somewhere, and possibly the server hardware to run them on.
Two firewalls are needed since the point of ISE to AnyConnect integration testing would be to confirm that you can enforce SG-based ACL’s on the FFW for remote access traffic. That is a topic for another blog. Our lab ran FTD on the FFW but ASA code on the AnyConnect firewall, in part because they both were physically older smaller ASA hardware. In addition, ISE / Security Group integration with ASA-based AnyConnect was a lot more mature than the FTD version, which apparently just recently became supported at the time we were doing this lab work.
Services
You can probably use your corporate copy of Microsoft Active Directory, etc. for authentication and MS groups. Similarly, you can use the main Call Manager to support the one lab Cisco phone. Both of these uses are low risk for lab-induced problems.
Since SDA requires that DNA Center be integrated with ISE, you probably will want lab versions of each. That is particularly true if you’re already using CCC to manage some of production. If you already use ISE in production, you probably don’t want to take any risks with it.
You might also want a lab FMC VM if you’re running FTD for firewalls. I tested with a CheckPoint FFW and had that working as well, with local Gaia and SmartConsole running on a Windows VM on my Mac.
If you’re going to tie in IPAM, you might want a lab version of that, just to make sure you somehow don’t do something in CCC that trashes your production IPAM.
With the lab diagram shown above, none of these services must be in the lab. They can be running (where possible) as VM’s on the company server farm. You’ll of course need admin privileges on those VM’s, and for the lab CCC and ISE.
Getting Lab Gear
If you’re pre-staging gear for a deployment, perhaps you can “borrow” equipment to build a lab for 4-8 weeks, while some sites are being deployed in some pre-SDA form, e.g. swapping out old switches but keeping the topology and configurations.
Future? Virtualize It!
If you have a virtual lab capability, and IF the switch images support SDA, it might be possible to virtualize all or most of the lab devices, and have the virtual lab communicating with the outside world for the services listed above.
Yes, you would need a couple-three powerful servers, with a lot of cores and RAM on the server(s). Cat9K images have historically been rather large! References